


It’s everyone’s favorite time of the year, where you can eat as much meat as you want! But before you get into pouring gravy over everything on your plate, it’s time to do your own Thanksgiving nail art! It’s important to dress up to the occasion, whether it’s Christmas, Halloween or in this case, Turkey Day. It adds an extra layer of awe and a feeling of accomplishment when you can choose something that goes well with the season or the occasion.
Let’s jump right into the Thanksgiving nail art ideas!

Plaid is the unofficial pattern of fall, and with a little twist by creating this design off-center on your nails. To recreate this amazing Thanksgiving nail art, start with applying a base coat. Then block off a section using light pink polish. You can make this section any size you want, just make sure it’s consistent in all your nails. Next, fill it in. Fill in the rest of the nail after outlining the edges of the square with deep red polish. Do an intersection of red polish on one side of the nail, and another intersection on the other with black. Finish it with a top coat, and you’re done. 🙂

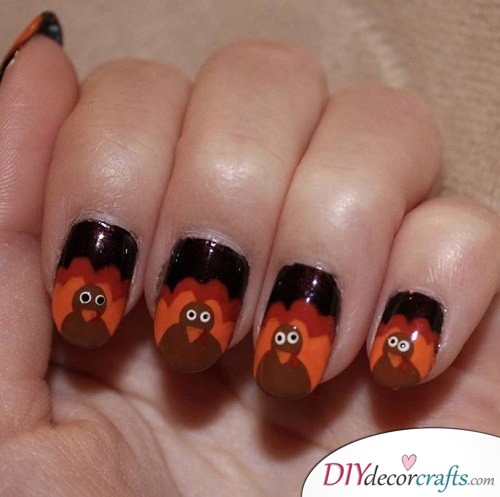
Turkeys are the main attraction (for me at least) of Thanksgiving. To recreate this amazing turkey design with feather accent, start with the turkey on your middle or ring finger. Apply a base coat followed by white polish on each nail. Then draw the first feather with a tiny brush and red polish. Draw the other feathers with yellow, brown and red polish. You will need a total of seven feathers. Once dry, create the head of the turkey. With dark brown polish, fill in the part where all the feathers meet, then draw the head of the turkey with a dotting tool using the same color. Draw the eyes with a dotting tool (white base with small circles for the eyes). For the beak, just draw a small triangle. Once dry, finish with a top coat.
Now onto the feather accents on other nails.
Use the same three colors you used to draw the turkey’s feathers. Draw 3 feathers of each color on different parts of your nail, finishing each with a quick dry top coat. For your other hand, you have two options. Either draw just the feathers or draw one turkey on one nail. It’s a super cute design, and I’m sure you’ll get a lot of compliments from your friends and family!

A different version of the Turkey Thanksgiving nail art, but the same concept. Apply a base coat, followed up with black polish. Then just outline both colors of the feather and fill both. Draw the turkey with brown polish and the head and eyes with a dotting tool. The beak can be drawn with a dotting tool or a tiny brush. Try remaining as consistent as possible.
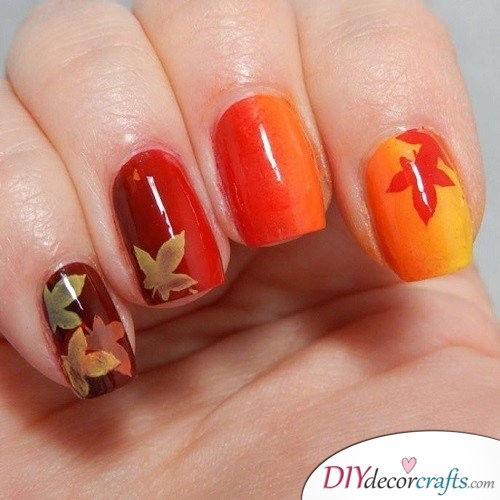
In a previous post, I have talked about how to do an ombre/gradient design in detail. For this amazing Fall Gradient effect, you will need four colors: deep red, red, orange and yellow. For the leaves, choose colors you want for the leaves (obviously) maybe ranging from green to orange, to symbolize the passing of the seasons. Apply liquid latex around your nails, paint the sponge to 2 colors and dab on your nails sideways. Repeat until you get the gradient effect you want and finish with a top coat.
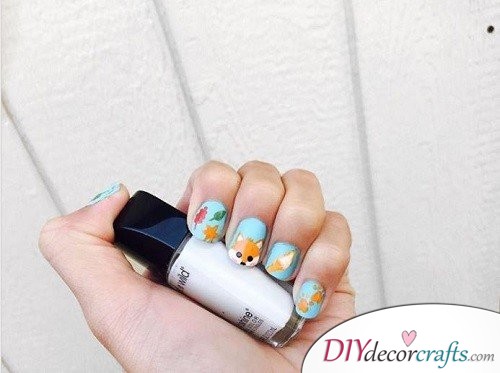
If you’re not a turkey fanatic, then try this!
Turkeys aren’t for everyone, but if you still want something cute and pretty on your nails, try the Fall Fox. Apply a base coat, and once dry a light blue polish. Draw the leaves first, then the head and tail of the fox. For the paws, just use a dotting tool and outline them once finished. End things with a top coat and enjoy this cuddly creature!
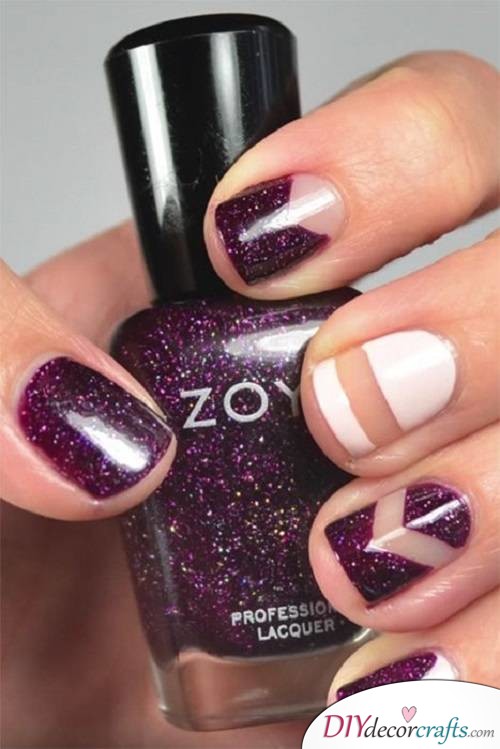
This Cranberry Shapes design is both stunning and magnificent. The design uses many stripes, so if you don’t know how, I’ll explain. First off, apply a base coat on your nails, followed by a layer of liquid latex. Then grab a Scotch tape and cut a large piece. Fold it in half, then draw and cut out a half V sign. Stick the cut out part on your nail. Now, grab a makeup sponge and paint deep purple glitter polish on it. Dab on your desired nail and watch the magic happen! Now, paint each nail as desired and finish each with a top coat. Simple, right?
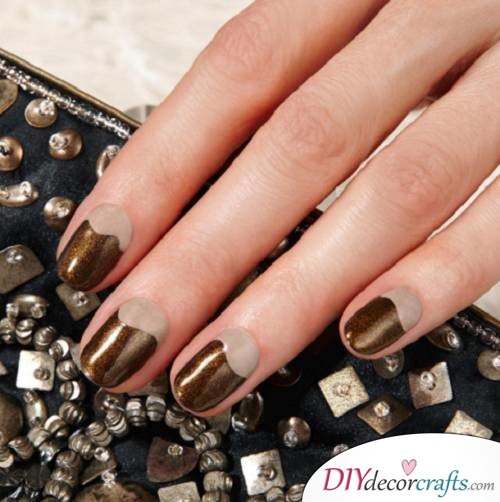
November is the perfect time to give this Metallic Shade the spotlight. Start with a base coat and once dry, grey shades across your nails. To get the wave effect, just outline the part the two colors intersect, then paint them with metallic bronze. To help this color retain its colors, as well as protect this Thanksgiving nail art, finish with a top coat.
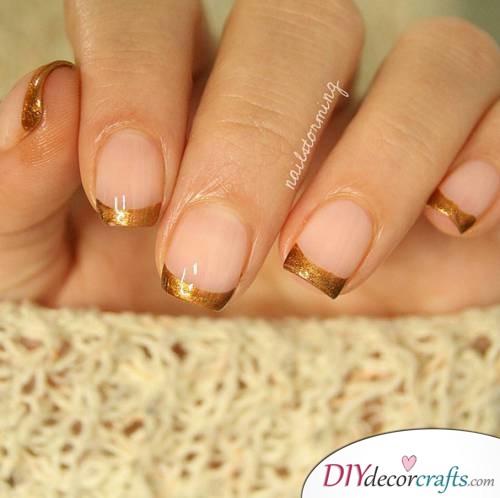
French tips will always be popular, and this chic design reminds us of that.
To get the perfect French tip done, start things with a base coat to protect your natural nails. This also helps to keep the French tip last for about a week. Follow it up with beige or light pink to enhance it even more. Now for the tip, just paint it with a gold metallic polish, but here’s the catch! Don’t move the brush, instead, start at the side of your nail and slowly rotate it. It works much better!
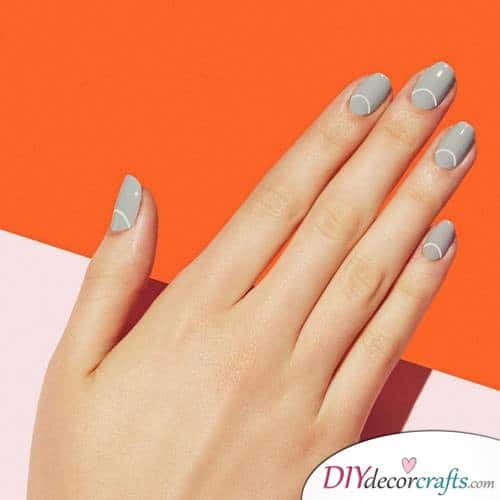
This simple Chic Gray is super impressive and cute, and not too over-the-top, so you can safely wear it at any family reunion. Start with a base coat, and once dry a white polish. Cut a thin tape as described earlier, and stick on your nails. Paint around it with bright gray polish to get this amazing look, and just finish things off with a top coat. You can also switch the line’s position, or have it consistent across your nails.
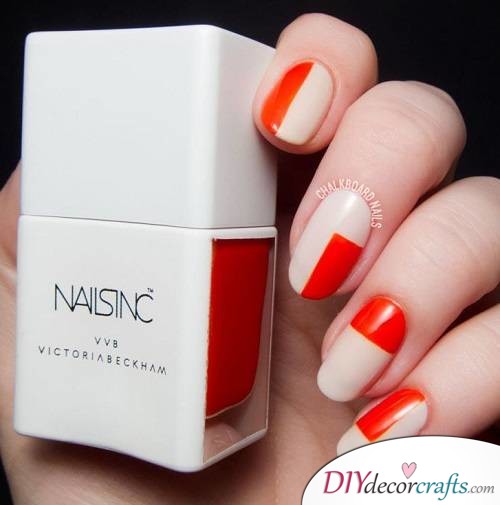
This color-blocked Creamy Orange Thanksgiving nail art is a great choice because it captures the eyes easily. It’s very chic and modern, and achieving it is simple. As always, start with a base coat and a white coat. Then outline each nail in a different style with a tiny brush. Fill up the nails and once dry, a top coat to seal the deal. It’s very simple, elegant and lasts long. But if it isn’t your color, try deep cranberry instead.
Thank you for reading our article: Easy Thanksgiving Nail Art Ideas Perfect All Month!
If you liked it, make sure to follow and pin us on Pinterest! Thank you! 🙂
Happy holidays!


